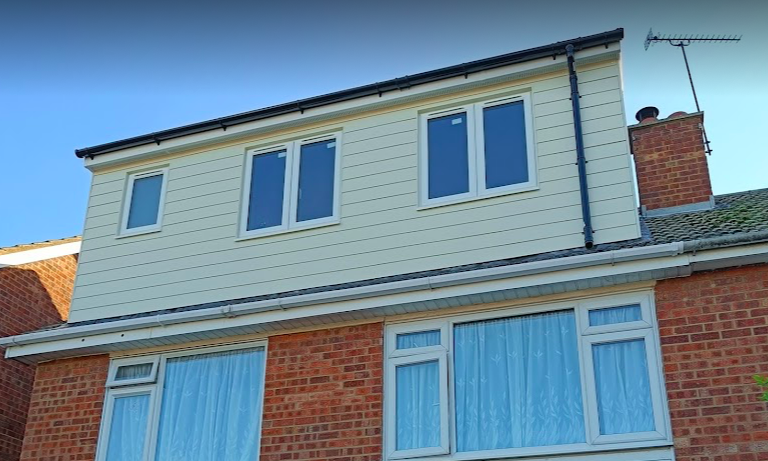
Transforming a Suffolk Home: A Stunning Flat Dormer Conversion in Ipswich by Complete Loft Conversions

Introduction:

Suffolk’s picturesque landscapes and historic architecture make it a charming place to call home. However, many homeowners in the region face the common challenge of needing more space while keeping budget on track In this blog post, we’ll explore a remarkable flat dormer conversion project carried out by Complete Loft Conversions in Ipswich, Suffolk. This transformation not only added valuable living space but also maintained the character of the home, serving as an inspiration for homeowners seeking a similar solution.

The Challenge:

The homeowners in Ipswich, Suffolk, had a beautiful council built home with potential hidden within its roof space. They desired extra space but were reluctant to compromise the charm of their home. They reached out to Complete Loft Conversions, a renowned loft conversion specialist, to explore their options.

The Solution:

Complete Loft Conversions designed and executed a flat dormer conversion that perfectly blended modern living with traditional aesthetics. Here’s a breakdown of how they achieved this stunning transformation:

1. **Initial Consultation and Design:** The project began with an in-depth consultation to understand the homeowners’ requirements and assess the property’s suitability for a loft conversion. The design process was meticulous, considering the architectural nuances and local regulations in Ipswich, Suffolk.

2. **Preservation of Architectural Character:** One of the most important aspects of this project was preserving the property’s historical character. To achieve this, the design incorporated elements such as matching exterior materials and maintaining the original roofline as closely as possible. The dormer extension seamlessly blended with the existing structure.

3. **Spacious Living Area:** The flat dormer conversion created a spacious living area with an abundance of natural light. Large windows and carefully positioned skylights were installed to ensure the room felt bright and inviting.

4. **High-Quality Finishes:** The homeowners opted for high-quality finishes that complemented the traditional elements of the property. Wood flooring, elegant moldings, and period-style fixtures and fittings were used to maintain the home’s unique charm.

5. **Energy Efficiency:** To ensure the space was energy-efficient, Complete Loft Conversions used modern insulation techniques and energy-efficient windows. This not only reduced the home’s environmental impact but also lowered utility bills for the homeowners.

6. **Bespoke Features:** Custom-built storage solutions and furniture were added to maximize the utility of the space. This allowed the homeowners to make the most of the new room for their specific needs.

Conclusion:

The flat dormer conversion in Ipswich, Suffolk, carried out by Complete Loft Conversions, is a shining example of how to add modern living space to a historic home while maintaining its character. The result was a beautiful room that not only enhanced the homeowners’ quality of life but also added significant value to their property. This project is a testament to the skill and craftsmanship of the team at Complete Loft Conversions, showcasing their ability to blend contemporary design with historical preservation seamlessly. If you’re looking to expand your living space without compromising your home’s character, this project provides excellent inspiration and proof that it can be done with the right professionals.

Haven’t posted for a while because been so busy with doing lofts this year so a quick post just to go though what’s been going on at CLC in 2021.

So we were commissioned to carry out a loft conversion at Defoe Rd this conversions was a big one with a flat dormer en-suite and some alterations to walls and making new openings downstairs.

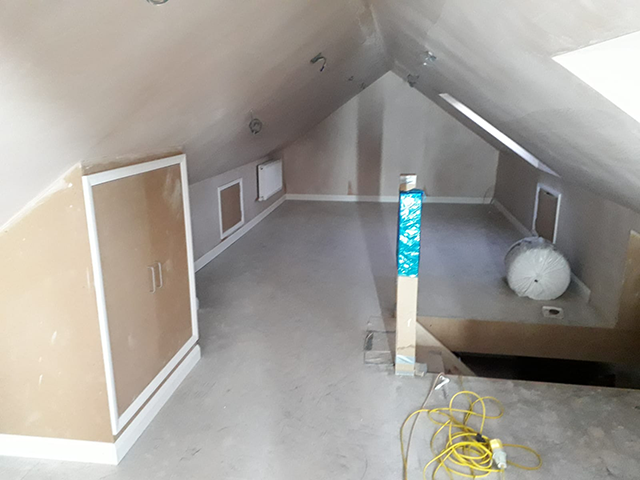
The loft conversion also incorporated new cupboards in the sloping part of the roof and two large flying mullion windows and a pair of Keylite windows side by side.

So below we can see a few images of the loft at different stages of the build I will update these fully when the bathroom is complete next week.

We have all been carry out many garden rooms through our sister company CLS but will post on our other website and link back to this post.

Loft being fitted with multi foil and first fix electrics


Staris fitted with spindles and balustrades
Stairs fitted with spindles and balustrades


Roof watertight with three layer felt


Loft plastered with side by side Keylite windows

We can see the loft on construction at various stages of the build the build took around 3 months as there were walls to move downstairs and openings to cut out but as we can see the end result is outstanding if you would like a quote for a conversion like this don’t hesitate to contact us

Complete loft conversions Ipswich have completed another loft conversion this one was a large 5 meter dormer construction with one roof window and fully kitted out en-suite.

Below we can see the glulams being installed and the ashler walls erected before taking out the finik trusses.

glulams-installed
glulams-installed

Here we can see the next stage of construction the joists between the gluelams and the chipboard floor being installed.

timber-floor-installed

After the timber floor is installed we installed the stair case to gain complete access to the loft.

Fitting-of-stair-case

Once the stair case has been fitted the the internal walls can be erected.

Internal-walls-erected

Once the internal work is completed we erect the scaffold and break through the roof and create the flat dormer as seen below.

Building-flat-dormer

We then build the dormer and dormer cheeks and put the facias and soft on then we also cald the top deck and felt the roof so we are water tight.

Flat-dormer-construction

As we can see below the dormer is built and water tight but not clad we need to put in the windows which and take a month on order before doing the cladding.

Dormer-built-but-not-clad

We also needed to put in a velux and ventilation for the cold roof above the dormer to keep the air flowing around the roof space.

velux-installed
velux-installed

We then set about installing the insulation which was 70mm celotex fitted tightly between the joists and rafters and taped with foil tape to stop cold spots.

Foil-backed-insulation-installed

We also celotexed the celing and around the dormer cheeks.

Celotex-around-dormer

We then put space blanket equivalent to 200mm celotex to get the U values for the build and the 25mm battens over to take the plasterboard.

Space-blanket-over-25mm-battens-for-vapour-barrier-and-more-insulation

Now with all the plumbing and electrics tested and checked the whole loft space is plasterboarded and plastered.

Loft-conversion-plastered

Here we can see the window board radiator and loft nearly complete

Dormer-and-window-plastered

We also fitted the bathroom to the clients specifications which included walk in shower,mermaid board,sink and toilet.

toilet
Armitage Shanks toilet installed

Complete loft conversions carry out the complete conversion to the last detail

shower
Shower installed

Here we can see the loft conversion with the scaffold down and all of the cladding guttering and lead work complete.

Completed-loft-conversion


Havent posted for a while but thought I would post up a couple of pictures of recent loft conversions the pictures below are of the I joists being installed I joists are a structural beam which negate the need for steels and can be installed by removing the first four rows of tiles and then being slid in to sit on the existing plate, also not the JES (joist end support) to give the joist riggidity when cut to fit in the eaves.

I-joist
I-joist

We can also see the gluelams before installation, gluelams are a structurally graded beam which come in standard and custom sizes the beauty of gluelams is they do the same job as a steel but are lighter stronger and easier to install and fix to and can also be cut on site to requirements.

glulams before install

With beams of this size and nature there is an issue with getting them up to the second floor so we usually hire in a crane and a banks man to help our team with the lifting as we can see below.

Beam-installation-with-crane

As we can see the creation of a new floor above the existing building has begun  once the beams are in place the next of the work can continue the creation of the stair well with gluelams and hangers connecting the old and existing joists to support them around the stair well and the creation of the ashler walls and the ceiling ties to support the new structure before the old fink trusses can be removed as shown below.


Before-fink-trusses-removedBefore-fink-trusses-removed
Before-fink-trusses-removed


after trusses removed
After trusses removed

So the existing structure is removed the weight is transferred onto the ashler walls which are the small walls in the corner which then transfers the weight onto the new I joists and the gluelams onto the wall plate of the existing building so what next we need light.

dormer under construction
Dormer under construction

As we can see we now need to create natural light by adding dormers by supporting the trusses either side with extra timbers for strength and remove the existing tiles battens and felt carefully before building the pitched roof dormer in this case there will be three so more to come when they are buit ok.


Complte Loft conversions are  specialists in Ipswich Suffolk area but we have also lately been taking on contract carpentry projects in the Ipswich area, along with our existing loft conversion projects we have also been adding some content to our website to make things clearer fro our customers including our pricing tables  and our guide on the process of carrying out your loft conversion which can be found here.

Our customers have asked us to carry on providing information about how different loft conversions are carried out and the different types of loft conversions that can be achieved in a type of roof space or particular building as the type of house you have affects what is possible within that area.

In the future we will dedicate a page to the types of loft conversions we carry out and what is most suited to the particular roof construction for each building which is most important as this often affects the costs of loft conversions.

Check back in a couple of weeks and something should be up concerning the types of loft conversions according to building types.


Call Now Button