CLC have been carrying out many extensions and loft conversions though 2019, to much to put on the site so we will just focus on Wind-rush Rd where we were commissioned to carry out a loft conversions for a lovely couple. The conversion consisted of steel beams sitting on the outer walls to take the new joisted floor, ashlar walls and rest of the conversion.
Beams installed with ashlar walls
Above we can see the joisting installed with ashlar walls with the insulation being placed within the floor we also had to install new 140mm rafters to take away the existing fink trusses.
Celotex installed
Here we can see the celotex installed with lighting ring installed we can slo see the flue for the boiler which needs to be boxed in we can also see the velux installed.
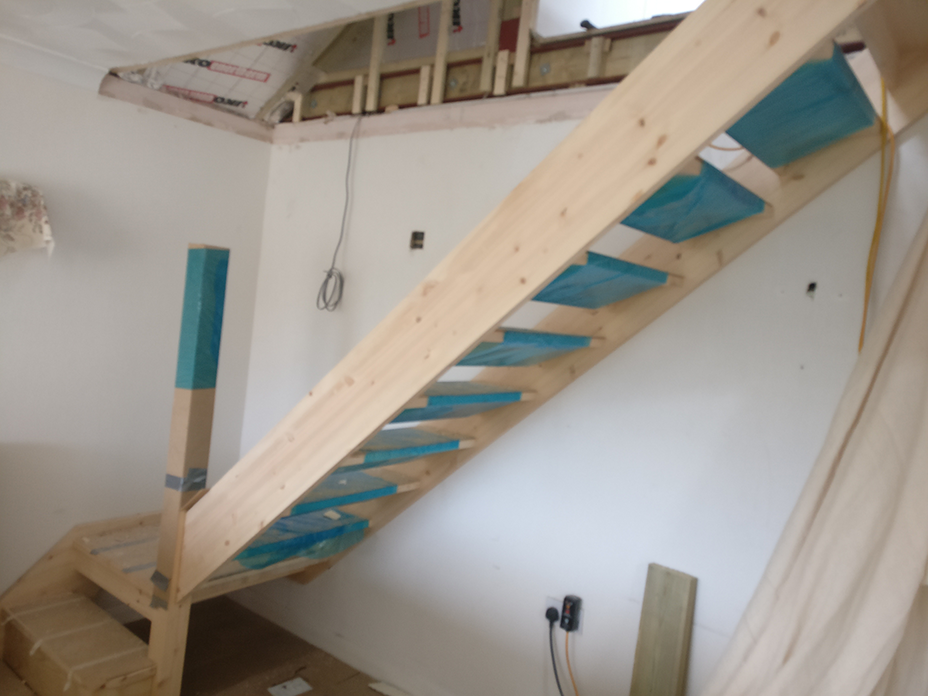
Stairs being installed
Here we can see the installation of the stiar case which was particularly tight this is an open tread staircase we can also see the ashlar walls with structural ply installed.
Stairs installed
Here we can see the stairs in the opening and the purlin to take the above rafters.
Landing being built
Here we can see the landing being built.
Open tread stairs installed
Here we can see the open tread stairs installed and protected
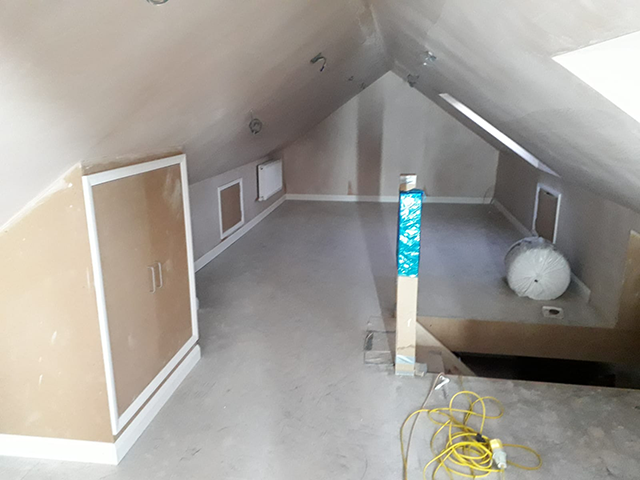
Loft plastered ready for painting
Here we can see the loft ready for plastering
Cupboards built to gain access to flue and storage
Here we can see the cupboards built to gain access to the storage space and flue.
Complete loft conversions Ipswich have completed another loft conversion this one was a large 5 meter dormer construction with one roof window and fully kitted out en-suite.
Below we can see the glulams being installed and the ashler walls erected before taking out the finik trusses.
glulams-installed
Here we can see the next stage of construction the joists between the gluelams and the chipboard floor being installed.
timber-floor-installed
After the timber floor is installed we installed the stair case to gain complete access to the loft.
Fitting-of-stair-case
Once the stair case has been fitted the the internal walls can be erected.
Internal-walls-erected
Once the internal work is completed we erect the scaffold and break through the roof and create the flat dormer as seen below.
Building-flat-dormer
We then build the dormer and dormer cheeks and put the facias and soft on then we also cald the top deck and felt the roof so we are water tight.
Flat-dormer-construction
As we can see below the dormer is built and water tight but not clad we need to put in the windows which and take a month on order before doing the cladding.
Dormer-built-but-not-clad
We also needed to put in a velux and ventilation for the cold roof above the dormer to keep the air flowing around the roof space.
velux-installed
We then set about installing the insulation which was 70mm celotex fitted tightly between the joists and rafters and taped with foil tape to stop cold spots.
Foil-backed-insulation-installed
We also celotexed the celing and around the dormer cheeks.
Celotex-around-dormer
We then put space blanket equivalent to 200mm celotex to get the U values for the build and the 25mm battens over to take the plasterboard.
Converting your loft is the best way to maximise the value of a house, adding a further bedroom or bathroom with a loft conversion remains one of the best ways to bring in an extra return when adding value and space to your property.
One of the biggest decisions loft conversion companies face when carrying out a conversion is which insulation to use,as this can not only affect compliance with the Building Regulations, but can also have a big impact on the living space within the room so it pays when doing a loft conversion to do your research.
Underthe new U values and the latest version the U-value for pitched roofs insulated at rafter level remains at 0.18 W/m².K, whilst for flat ceilings the minimum is 0.16 W/m².K.
A well-insulated loft conversion can also reduce heating bills and CO2 emissions. This means home owners should not only see the financial benefit o, but also indirectly with an improved Energy Performance Certificate (EPC). Recent research suggests that this can significantly raise the value of a house when home owners are looking to resell.
Insulating to the Building Regulations with traditional products such as mineral fibre can be a pain, with the thicknesses required to achieve the desired performance often exceeding the rafter depth and seriously cutting into the headroom space that’s why many opt for Celotex or a rigid insulation board .
Which is less likely to sag or slump, resulting in un-insulated pockets, which can in turn lead to thermal bridging, surface condensation and mould growth.
Rigid boards has a fibre-free core, is unaffected by air-infiltration and is resistant to ingress from moisture or water vapour and many other environmental conditions. This allows it to maintain its thermal performance throughout the life of the building when correctly installed.
Many loft conversion companies are also using space blankets which have come down in costs considerably and can be used in conjunction with rigid insulation to achieve very high U values when installed properly, some loft conversions are using rigid board inside the rafter space blanket and the plasterboard with further insulation behind.
Loft conversion u regs
Kingspan Kooltherm have released the following guidelines to help loft conversion companies and builders reach these new guidelines which are as follows.
For houses with shared roofs and when the roof covering is not being replaced, the best approach is to install insulation between the rafters with a further layer of insulated plasterboard below. This ‘between and under’ approach helps to reduce thermal bridging through the rafters.
The Building Regulation requirements can be met by installing 100mm Kingspan Kooltherm K7 Pitched Roof Board between rafters and 39.5mm Kooltherm K14 Insulated Plasterboard below. As the space between rafters may vary it is essential to measure each gap before cutting to ensure a tight fit. Any gaps are filled with an expanding insulated foam and / or flexible sealant.
Where a non-breathable sarking material such as felt is used, a ventilation gap of 50mm is required above the Kooltherm K7. To maintain this gap and ensure the board is flush with the bottom of the rafters, timber stop battens can be nailed to the rafters at the appropriate depth.
The plasterboard is then fitted with the long edge running horizontally across the rafters, lapping by at least 20mm at joints. The boards are fixed in place with drywall screws at a maximum of 200mm centres, and no less than 10mm from the edge of the board at bound edges (paper bound) or 13mm from non-bound edge. Screws should be long enough to penetrate at least 25mm into the joist without being overdriven.
To meet the U-value requirement of 0.16 for areas of flat ceiling, 75mm Kooltherm K7 is fitted between joists and 69.5mm Kingspan Kooltherm K14 is added below using the same installation approach.
For dwarf walls 50mm Kooltherm K12 Framing Board is installed between timber studs and 29.5mm of Kooltherm K14 on their inner face.
When re-roofing a detatched property it is best to insulate using a “between and over” approach. For pitched roofs 50mm Kooltherm K7 Pitched Roof Board is installed between the rafters using sarking clips driven into the top of the timber at 1 meter centres to hold them in place.
A further 60mm of Kooltherm K7 is then installed over the rafters with care taken to ensure that any joints on boards running from the eaves to ridge occur over rafters. A breathable sarking membrane such as the company’s Nilvent is then overlaid and the boards can then be held in place with counter battens (38mm x 38 mm).
For enhanced airtightness with this arrangement a further breather membrane can be added between the two layers of Kingspan Koolthem K7, with all joints or gaps sealed using airtight tape.
Here at complete loft conversions we like to meet and talk to our customers about their projects and how they can get the most out of their building project whether its a loft conversion or a extension that’s why we offer a no obligation site visit for an informal discussion about your project to see what extra ideas can be added before the architect comes to view and submit your drawings subject to your approval a full list of this process is available here.
I find a sit visit to view your project is always good to get an idea of what the loft space or extension is to be used for (bedrooms, games room, ect) this helps when deciding how to divide the rooms and spaces to get the maximum benefit out of your home.
So if you wish to find out more about how we can help you with your conversion please contact us here or call us for an informal chat on what can be achived in your loft space.